This is a guest post by Mathias Pius, who has dual experience as a Software Engineer and in Operations & Infrastructure, with keen insights into the unique challenges associated with each discipline, but importantly also the contact point between them.With the pendulum of Cloud vs. On-premises swinging slightly towards on-premises again, some might be considering moving their Kubernetes clusters onto bare metal while nursing their scars from the last time they tried managing their control plane using kubeadm. Others have been using bare metal the whole time, but have been hamstrung by lead times on hardware or regulatory pressure to keep sensitive information on-premises.
With a hybrid cluster, you can have your cake and eat it too – running the main cluster on-premises, but allowing it to expand and scale into a public cloud – and Talos Linux makes it easy. Talos is a Linux-based operating system built specifically for running Kubernetes. It lets you manage your entire machine state through a single configuration file, significantly reducing the maintenance burden of running and upgrading your cluster using its talosctl command line utility.
Starting Point
In this article, you’ll extend an existing 3-node Kubernetes cluster onto a cloud-hosted virtual machine over the internet. If you don’t already have a cluster, you can set one up using Docker, QEMU or VirtualBox. The process for getting a Kubernetes cluster running on Talos is the same regardless of the platform it runs on:
- boot machines off the Talos Linux image
- define the endpoint for the Kubernetes API and generate your machine configurations
- configure Talos Linux by applying machine configurations to the machines
- configure
talosctl - bootstrap Kubernetes
For more information see the Getting Started guide.
In this case, the cluster is running Talos v1.6.4 and Kubernetes v1.29.1 and is made up of three bare metal nodes, all acting as control planes:
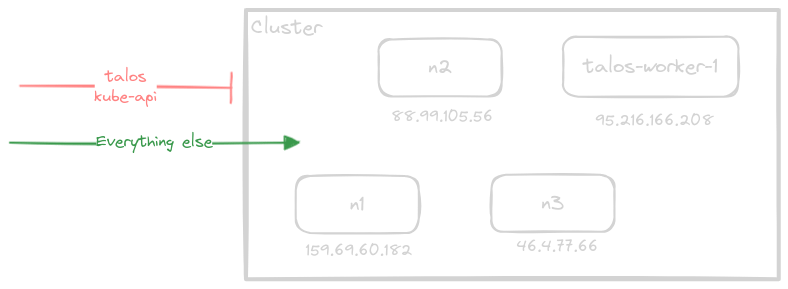
$ kubectl get nodes -o wide NAME STATUS ROLES AGE VERSION INTERNAL-IP OS-IMAGE KERNEL-VERSION n1 Ready control-plane 250d v1.29.1 159.69.60.182 Talos (v1.6.4) 6.1.74-talos n2 Ready control-plane 247d v1.29.1 88.99.105.56 Talos (v1.6.4) 6.1.74-talos n3 Ready control-plane 247d v1.29.1 46.4.77.66 Talos (v1.6.4) 6.1.74-talosInter-node communication happens over public IPs. No private networking is configured, and therefore, each node in the cluster is configured to explicitly block access to the Talos (50000-50001/tcp) and Kubernetes API (6443/tcp) ports from anything but the nodes within the cluster and the work station we’ll be using to access the cluster.
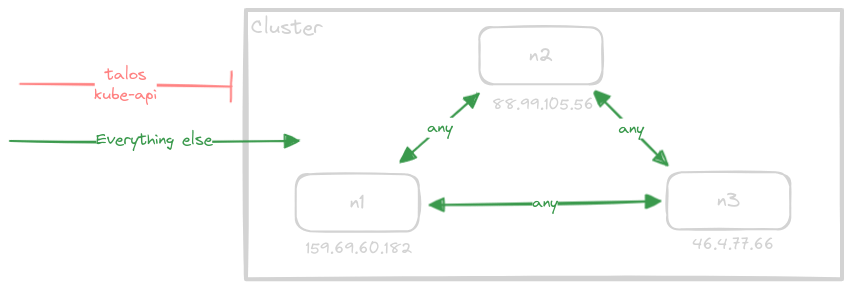
All other traffic is allowed through the external firewall to allow more fine-grained control configured via network policies.
Potential Pitfalls
The reasons for hybridizing your cluster are great, but there are a couple of things to watch out for:
- Latency. Your control plane nodes should always be close to each other! Etcd (the key-value store control planes use internally to track state) is very sensitive to latency, and geographically distributing these nodes might render your cluster unusable in the worst case. Even your workloads need to take latency into account. Running your web service on a 128-core 2TB memory node in the cloud is not going to do anything to compensate for an 800 millisecond round trip time to your on-premise database.
- Security. While all Kubernetes API traffic uses HTTPS by default and is therefore encrypted, it is entirely up to the Container Network Interface (CNI) plugin whether standard pod-to-pod traffic is encrypted when crossing the host boundary. Many network plugins like Cilium, Flannel, and Calico support this, but it has to be enabled and generally comes with some caveats. As we shall see, Talos Linux has a solution for this, too.
The Chicken-and-Egg Problem
With a single-platform cluster, locking it down is pretty simple. Once you start opening the door to traffic between platforms, managing your firewall(s) suddenly becomes a lot more complicated, and complexity opens the gate for misconfiguration and expands your attack surface. A great way to solve this is to manage trust between nodes using end-to-end encryption directly.
This became a lot easier with the introduction of Wireguard. Instead of relying on your router supporting IPSec or OpenVPN and hoping that your cloud provider supported it (without charging you an arm and a leg), you can now configure an extremely high-performance, full-mesh, node-to-node, encrypted solution.
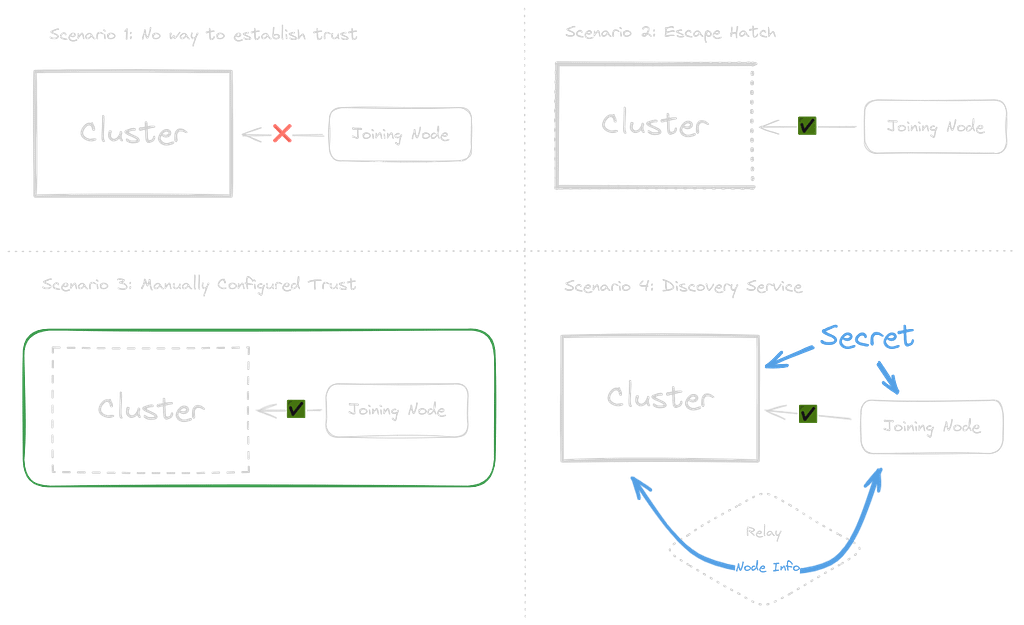
However, this solution does present unique challenges: how do you establish an encrypted connection to a node you don’t know or whose only method of communication is encrypted?
There are only three solutions to this problem:
- Scenario 1: Escape Hatch. Let some traffic bypass the encryption layer and communicate with the cluster directly. This is what Cilium does. This is a decent solution, but it can potentially expose unencrypted traffic under some circumstances.
- Scenario 2: Manually configured. Establish a trusted network beforehand, effectively doing all the heavy lifting yourself.
- Scenario 3: Discovery Service. If you already have a shared secret that all nodes know when they’re provisioned, you can transmit encrypted node information (public key, endpoints) between nodes using a third party as a relay. As it turns out, this is exactly how Talos’ KubeSpan works!
Node-to-node encrypted mesh
KubeSpan is a feature built into Talos Linux which establishes a Wireguard-based mesh network between all nodes similar to products like Tailscale, except all aspects of the mesh are managed by Talos itself. When Talos Linux nodes have the configuration applied to join a specific cluster, they have cluster specific security keys. They use this to encrypt the information they send to the discovery service, so only other members of the same cluster can decrypt it – the discovery service cannot decrypt the endpoint information. This sidesteps the chicken-and-egg problem of Cilium by using an external discovery service to distribute end-to-end encrypted public keys and node information, meaning all inter-node traffic is always encrypted. The only traffic you must allow across your firewall is the standard 51820/udp wireguard port.
Enable KubeSpan Overlay Network
Turning the KubeSpan feature on is simple. If you’re deploying a new node (which we’ll do later), you can set the --with-kubespan flag when generating the MachineConfig using the talosctl gen config utility.
For an established cluster, setting the KubeSpan and Discovery feature selectors in each of your MachineConfigs to true is all it takes. For a small cluster, the simplest way to achieve this is to apply the above as a patch to all your nodes:
$ talosctl -n 159.69.60.182 patch machineconfig --patch ' machine: network: kubespan: enabled: true cluster: discovery: enabled: true'Repeat the above for each node in your cluster, and you’re done!
From here, Talos will take care of all the public and private key management, routing and interface configuration required to establish the Wireguard connection between all the nodes.
We can inspect the resources Talos uses to manage this connection to verify that it’s working.
- Checking that our node has produced a
KubeSpanIdentitywhich corresponds more or less to a standard Wireguard configuration, a public key and a unique locally addressable IPv6 address used within the mesh network to route traffic:
$ talosctl -n 159.69.60.182 get kubespanidentities NODE ADDRESS PUBLICKEY 159.69.60.182 fd57:1f05:2cd4:2402:921b:eff:febd:9bda/128 zU7/U2J0Y8hfIakmsdT+lP7GrcbYrBoKsQbbNbMt20k=- Seeing that it is aware of the other nodes via
KubeSpanPeerSpecs:
$ talosctl -n 159.69.60.182 get kubespanpeerspecs NODE ID LABEL ENDPOINTS 159.69.60.182 GPQBNyo3Tv... n2 ["88.99.105.56:51820"] 159.69.60.182 PU9nhYz7Ew... n3 ["46.4.77.66:51820"]- Verifying that traffic is getting routed between them using the
KubeSpanPeerStatusesobject:
$ talosctl -n 159.69.60.182 get kubespanpeerstatuses NODE ID LABEL ENDPOINT STATE RX TX 159.69.60.182 GPQBNyo3Tv... n2 88.99.105.56:51820 up 34464488 63721816 159.69.60.182 PU9nhYz7Ew... n3 46.4.77.66:51820 up 9079656 22087720With a peer state of up and both tx (transmitted bytes) and rx (received bytes) already showing megabytes of traffic, it’s clear that our mesh network is configured and working!
If the peers don’t show as up, check to ensure you’ve allowed traffic to each node on port 51820/udp.
Security: Unlike services such as secure shell (SSH), which uses stateful TCP to establish and keep its connection to the target server alive, Wireguard uses UDP and drops incoming packets that present keys the nodes is not configured to accept. This means that allowing traffic from the internet to this port is perfectly safe and reasonable, assuming you can keep your Wireguard keys safe. To a potential attacker, a closed Wireguard port is indistinguishable from attempting to connect to an open Wireguard port with invalid credentials. Wireguard’s cryptographic keys are more than sufficiently secure to ensure they can’t be broken.
Allowing access from anywhere comes in handy in the next section, where we’ll provision a Cloud VPS with an as-of-yet unknown IP address. Allowing access from anywhere saves us the trouble of going back and modifying our firewall policies every time we provision a new server.
Creating the Talos Image for Hetzner
We’ll configure a virtual server in Hetzner Cloud. Talos provides official AMIs for setting up EC2 instances in AWS, for example. Hetzner Cloud has no equivalent to the AMI marketplace, so we’ll have to get our Talos image into the cloud ourselves.
Hetzner offers three simple ways of doing this:
- Boot a virtual machine in
Rescue Mode, which starts the server using an ephemeral operating system loaded into RAM, allowing us to overwrite the server’s boot disk and take a snapshot of the virtual machine disk before deleting the server itself. - Use HashiCorp’s Packer utility to do all this for us automatically.
- You can email Hetzner and ask them to upload the image for you, making it available in their cloud console, but this might take quite a bit longer.
Packer is an excellent solution to this problem, which makes upgrading your base image to newer versions of Talos easier and much less error-prone than manually booting and wgetting files onto a disk every time a minor version of Talos is released.
Go ahead and install Packer using your package manager, or get the binary itself directly from the Packer website.
Next, we’ll need a Packer configuration describing how our image will be built. The official guide for deploying Talos to Hetzner Cloud has a great Packer config file necessary for creating the image, which we’ll be using in a slightly abbreviated format, since we don’t care about building our images for platforms other than amd64, and all our servers will be running in the Helsinki (hel1) datacenter:
# hcloud.pkr.hcl packer { required_plugins { hcloud = { source = "github.com/hetznercloud/hcloud" version = "~> 1" } } } variable "talos_version" { type = string default = "v1.6.4" } locals { image = "https://github.com/siderolabs/talos/releases/download/${var.talos_version}/hcloud-amd64.raw.xz" } source "hcloud" "talos" { rescue = "linux64" image = "debian-11" location = "hel1" server_type = "cx11" ssh_username = "root" snapshot_name = "talos-${var.talos_version}" snapshot_labels = { type = "infra", os = "talos", version = "${var.talos_version}", arch = "amd64", } } build { sources = ["source.hcloud.talos"] provisioner "shell" { inline = [ "apt-get install -y wget", "wget -O /tmp/talos.raw.xz ${local.image}", "xz -d -c /tmp/talos.raw.xz | dd of=/dev/sda && sync", ] } }With Packer installed and our configuration saved to hcloud.pkr.hcl, we’re almost ready to build the image. The only thing left to do is to create an API Key for Hetzner Cloud with Read & Write permissions so Packer can provision servers and store snapshots on our behalf. Creating the key is done through the Console under Security -> API Tokens. Keep it saved somewhere safe; we’ll need it for Packer and later use it to provision our servers.
Let’s export our new token and build our image:
$ export HCLOUD_TOKEN=pW0p2lsDPwNhluykbkAlLPoLQQHLuVUaIN5Naf1ykB1Cq97zyuun5k3I0etDpblm $ packer init . $ packer build .Side note: Packer is designed similarly to Terraform, where most of the non-core functionality is implemented by “plugins”, with which Packer communicates to do all the provider-specific tasks. The packer init . command above looks at our config file and notices that we’re using github.com/hetznercloud/hcloud and automatically fetches that plugin for us.
At this point, your terminal should be full of colored output, hopefully concluding in something like this:
==> Builds finished. The artifacts of successful builds are: --> hcloud.talos: A snapshot was created: 'talos-v1.6.4' (ID: 150744957)If we now look under Server -> Snapshots in the Hetzner Cloud Console, we should see a recently created image named talos-v1.6.4, with a size of around 300MB.
Because Talos is completely unconfigured and boots into a Maintenance Mode by default, we can re-use the images for all the virtual machines we’ll need.
Setting up the firewall
Since we’re using KubeSpan, the only ports we’ll need to have open is the 51820/udp wireguard port from anywhere.
Hetzner Cloud provides its own command line interface tool hcloud, making managing your servers and firewalls directly from the terminal easy. These steps can be done through the Hetzner Cloud Console, but the process is more straightforward to explain using a terminal.
The first step is configuring a context, which is just a way to associate our API Key with an easily recognizable name. We’ll call ours talos:
$ hcloud context create talosIf the HCLOUD_TOKEN environment variable is still set from when we built the image using Packer, hcloud will offer to import it for you; otherwise, you will have to enter the key again.
This new context will automatically get set as the active one, which means we’re all set. As a trial run, let’s make sure our image is listed:
$ hcloud image list --type snapshot ID TYPE DESCRIPTION ARCHITECTURE IMAGE SIZE DISK SIZE CREATED 150744957 snapshot talos-v1.6.4 x86 0.29 GB 20 GB Wed Feb 21 11:43:26 CET 2024Specifying --type snapshot will exclude all the official Hetzner Cloud images, which we aren’t interested in.
Next, let’s create a firewall that blocks all traffic except KubeSpan. Since the node can be configured entirely via user data later, we won’t need access to the Talos API. We only have one rule so that we can do it all from the command line:
$ hcloud firewall create --name talos-workers --rules-file - <<< '[ { "description": "Allow KubeSpan Traffic", "direction": "in", "port": "51820", "protocol": "udp", "source_ips": [ "0.0.0.0/0" ] } ]'Joining a node
Now comes the fun part: extending the cluster past its current environment.
Let’s create a MachineConfig for our new worker node. When you created your cluster initially, the talosctl gen config command would have output files for both control plane nodes and worker nodes. If you no longer have the worker.yaml file, you can recreate it assuming you have access to the secrets.yaml file of your cluster. Creating the worker config can be done using the talosctl gen config command as below:
$ talosctl gen config \ --with-kubespan \ --with-secrets secrets.yaml \ --output-types worker \ your-cluster-name-here \ https://<Cluster API Endpoint>:6443 generating PKI and tokens Created worker.yamlOur worker’s MachineConfig has now been written to worker.yaml, which means we’re almost done!
From here, spinning up the new server is the easy part:
$ hcloud server create --name talos-worker-1 \ --image 150744957 \ --type cx21 \ --location hel1 \ --firewall talos-workers \ --user-data-from-file worker.yamlThe server will now be provisioned, after which the CLI tool will print some information about the server we won’t need since all the configuration happens automatically.
We should see our worker node joining our cluster if everything goes as planned:
$ watch kubectl get nodes NAME STATUS ROLES AGE VERSION n1 Ready control-plane 243d v1.29.1 n2 Ready control-plane 239d v1.29.1 n3 Ready control-plane 239d v1.29.1 talos-worker-1 Ready <none> 7m55s v1.29.1And there it is, our talos-worker-1 server is Ready! Checking out the KubeSpanPeerStatuses again, we can see that the node has joined the mesh network and is communicating with our control plane nodes, with all traffic within the cluster encrypted on the wire with full node-to-node encryption, automatically:
$ talosctl -n 95.216.166.208 get kubespanpeerstatuses NODE NAMESPACE ID LABEL ENDPOINT STATE RX TX 95.216.166.208 kubespan GPQBNyo3TvUtCitG6hVTaEVYeQuxe+/V87xr5MCxnSo= n2 88.99.105.56:51820 up 3490040 650808 95.216.166.208 kubespan PU9nhYz7Ew/BVBZA1c6D6xBY9ZE2iwJURBPT8cWpxw0= n3 46.4.77.66:51820 up 135604 80020 95.216.166.208 kubespan zU7/U2J0Y8hfIakmsdT+lP7GrcbYrBoKsQbbNbMt20k= n1 159.69.60.182:51820 up 101908 75824And with that, we’re all set! Installing tools, configuring the image, and setting up the firewall took some legwork. However, deploying the server was painless and this enables us to quickly scale to 1, 3, 20, or even hundreds of workers! Of course, managing these nodes long-term and keeping them all updated, while easy to automate with the talosctl CLI, is much simpler with Sidero Labs’ Omni solution.
Encore
Since all node-to-node traffic happens over the encrypted KubeSpan/Wireguard tunnel, we can simplify our network setup by removing all the rules that allow node-to-node traffic since the wireguard 51280/udp traffic is already allowed.
Without KubeSpan, we would have had to configure firewall rules for every node pair, doubling the number of firewall rules for every node we added!